Picnik Photo Editor is one of the most used online photo editing software. “How to use picnik ?” is one of the most common question that most of ours users ask us. So we decided to create a very easy to understand guide about picniking a photo, using Google’s Picnik .

Picnik Photo Editor: Basics
The first thing you must to know is that picnik is a fully functional online photo editor software, so, you don’t need any download to use it. But you can perfom a picnik download adout addons and Plug in designed to work with your browser.
The second thing you must to know is that in picnik there are 3 different Kind of Users:
- Unregistered users: This Kind of users use picnik on the fly, and than go away.
- Registered users:This Kind of users creates an account on picnik.com site and has space to store uploaded photos and video slide. The uploaded photos can be found anytime they access to picnik.

- Pro Users: Pro Users are paying users, that can access all funcions and filters of picnik. Being a Pro User require a 2,08$ fee per month.
My Suggestion is to Create a picnik account. You will be able to manage and see your uploaded photo easily.
Picnik Photo Editor: Picnik Working Area
This is the mail picnik working Area, let’s give a look, now, how picnik working area is Organized.

- Main Working Area: In this canvas, will be displayed the active picture or photo, ready to be edited by picnik instruments you will be able to see in this area live effects previews, filters etc.
- Left Side menù: this is a very important menù, here will appear all the effects and filters name you can use in picnik, organized in category. This menu will display also, the active effects, and the options of it to modify the effects features.
- Top Menu:This Top menù is divided in categories too. the Categories are:
Home:in the Home you can find the buttons to upload your photos in picnik;

Library: In the Library section there are all your recently uploaded Photos; Edit: The most important menù, all you need to edit a Photo can be found here;
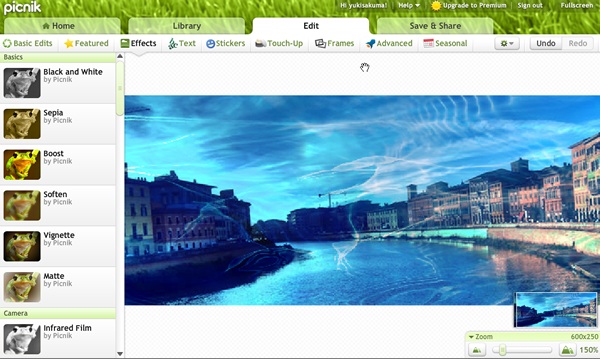
Save&Share:Use This section to Save and share your edited Photos.
- Zoom tool: This is the Zoom tool, you can see also the current width and Height of your photos. Very useful to edit small photos area accurately.
Let’s practice now! I will show you a simple demonstration of Picnik Photo Editor features
Picnik Photo Editor: Editing Photos in Picnik
Step 1 -Â Upload a photo
The first step to edit a photo in picnik, is to upload a photo. In order to do that you must, first of all, access to picnik homepage. Picnik Application will be loaded in few seconds, and the “Home” page shown above, will appear.
Now you have to upload a photo from your Hard Drive. To do that just press the Buttons and Browse throught your files and choose the photo you want to edit.

You can upload your photos in picnik in many different ways. today will see the most common one. Press the greein Button and Browse throught your files.
Buttons 1 and 2 once pressed, will open a little window to browse and select the file to uplod. The three photos at the bottom of the button (3) are demo photos, just click on them to open a demo photo to use in picnik.
Step 2 – Auto-fix of a Photo
The photo will be placed in the mai working area of picnik and the editing process can start.
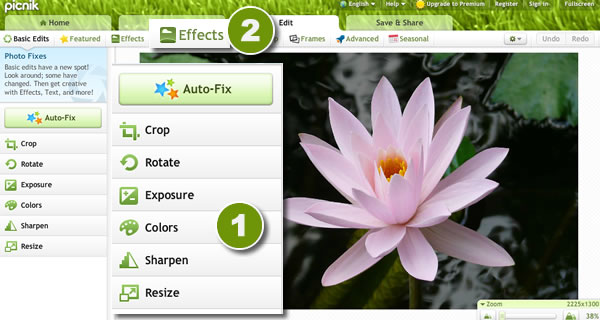
At the first time, The Basic Edits will be Active. In Basic Edits, (1) You can find all commons editing instruments like Crop, Rotate, Exposure, Colors, Sharpen and Resize. Before Starting to add filters to your Photo, you can click on Auto-Fix Button, to fix color, sharpen and exposure automatically. To begin to applying filters and effect press the Effect button (2) in the Top Menu.
Step 3 - Browse the Edit menù
Once pressed the Effect Button, a list of available effects, will appear in the left side of the screen. Picnik has a huge number of Effects and filters. Recently I wrote a Post concerning Picnik Effects in this post you can see a complete overview of picnik effects applied in a single example image.
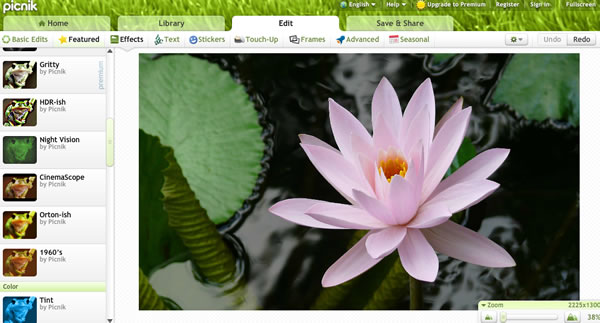
Choose the effect you like, and clik it, a new menu will scroll down, from the bottom of the name of the effect. The effect choosen will be automatically previewed in the canvas.
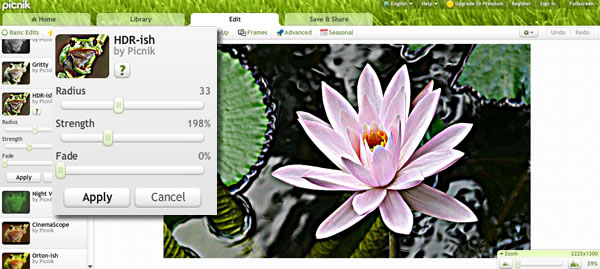
For this Example I Chosen the HDR-ish Effect, one of my favorite effects ever. As you can se, a new little window as scrolled down and new options has appeared. Using the Bars you can Adjust Radius, Strenght and Fade of the effect, in order to reach the perfect mix. Once Finished, just clik on Apply button. After That you can click another effect an add it again to the Photo.
Step 4 -Â Save your work
To save your work, just clik on Save & Share Button, a New screen with all the saving option will appar.
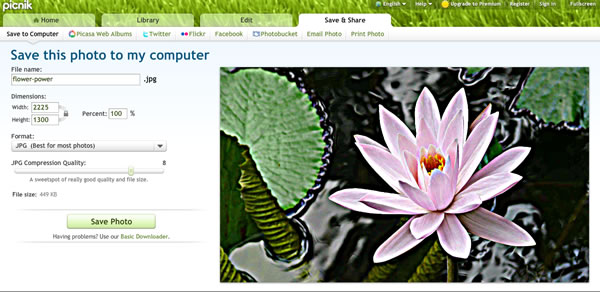 In this window, you must set the name of your file, (that will be saved to your desktop) and set the width and Height of the foto.
In the Format Settings, you can choose the extension of the image file. You can save in JPG or PNG format.
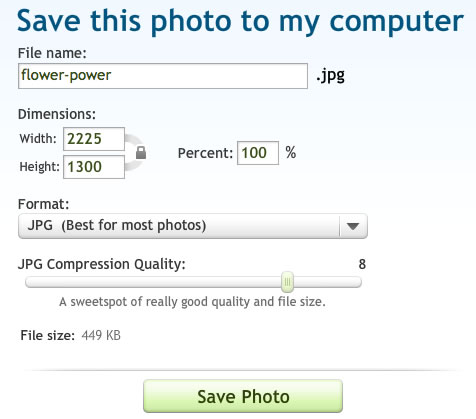
If you Choose to save in JPG Format you can set the compression quality scrolling the percentage bar that will be appear choosinf JPG Format.
You are now, one step away to finish your first editing with picnik. Just click on Save Photo, and the photo will be automatically saved on your desktop.
This is just an example how to edit a photo using picnik, you can add as much filters and effects as you want.
I Hope this tutorial will be usefull to you and don’t forget to share it with your friends using the buttons Below in Facebook, Google + and Twitter.

25 Responses to Picnik Photo Editor: Beginners Guide